3.28.2012

Dream Believe Thrive with SRM Stickers

  Happy Wednesday everyone!  I am back to share a very special project I created using SRM Stickers for a dear friend.  
I started with a Bravissimo ribbon from Making Memories. I used a cupcake liner and then added an extra large scallop punch in cream card stock to the center. I punched a large salmon colored circle from card stock, added SRM sticker sentiment from Celebrate Life #39046 and a ribbon border from Think Pink #49010, then popped it up with foam dots. I placed the pink ribbon sticker, also from Celebrate Life, on a piece of cream card stock, trimmed, and attached it to the top.

The three tails are stickers from Think Pink and were also placed on cream card stock, trimmed, and then tucked under the scallop. A few drops of pink glitter to accent and it was done!"


I made this for a special friend that just received  word she is now cancer-free. She deserves so much more than a ribbon after the battle she fought. She wears something pink on herself everyday, and I thought maybe she might want something a little bit more for those days she really wants to shout it out that she is a survivor!"
Thank you for stopping by!

3.26.2012

A donkey wish

  Wow!  I am back after a major computer problem.  My registry was not working properly and would not allow me to access any program.  It required me to restore the computer to original settings and let me say this to you: back up your stuff!  That was the worst part and then reinstalling programs.  It is still a little wonky.  I was doing a lot via the iPad but not crazy about the cutting and pasting on it and redoing photos.  So...here am I!
This is my version of a masculine card.  Hubby will understand as he used to use this word a lot to refer to people that weren't so bright.  It became larger than life because we found a little stuffed donkey while in St. Martin and started to take it with us on our travels around the world.  So when I saw this donkey stamp, I had to have it!  He might be reading this so pretend you never saw this card honey!  At this point you are probably thinking we are rather odd!  Yeah, maybe a tad.  I like to think of it as having fun!

The challenge at Paper Playtime is to create a masculine card with a stamped sentiment.  I used this American Crafts set paired with Basic Grey pattern paper and a touch of Simple Stories. 
Hope you will join us!
Challenges I would like to enter my card in:
Craft Your Days Away: #41 Just for Boys plus buttons
Lollipop Crafts: Anything Goes
Love to Create: #8 Masculine
Karen's Doodle's: #101 Make if for a male
The Crazy Challenge: #112 Add a sentiment

supplies used:
card base: Paper Studio
pattern paper: Basic Grey and Simple Stories
stamps: American Crafts
ink: SU Chocolate Chip and Basic Black
twine: craft
button: Making Memories
other: foam dots and Singer sewing machine


3.18.2012

Vintage Street Market

 Hey there!  I hope you are having a wonderful day!  I am back to share with you a few cards I created making some handmade embellishments with lots of vintage love!
Okay first up is...
I created this card using Family Fun Set's Captain Johnny (stripe), Distinguished Boy (print) and Meghan Kay (polka dot).  I mixed in a piece of vintage film strip and little Twirly Twine in brown with a ticket.
I began with the stripe print which I used a corner rounder on the right sides.  Then I used a little ink to distress the edges.  I sewed down the stripes in two different stitches for a little dimension.  The film strip is stapled to the polka dot panel which doubles as a pocket to house the tag I made.   I created the tag from the printed paper and added a circle punch from cream card stock which the brown Twirly Twine is tied to.  Easy to do and then you can be sure to have a matching tag for all your creations.  The distinguished gentleman cap was punched out with a large circle punch .  I cut out the little square photo  and added it with foam dots.    Final step is to add the ticket from the Twirly Twine.
Next is my Candyland card.
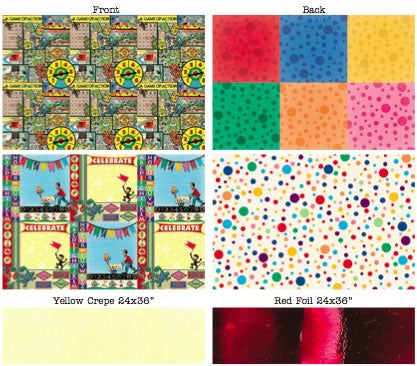
I love the vibrant colors in the Party Games set.  This card uses lots of items from the Paper Sheets & Tags  Party Games to the extreme.   I cut a panel of the green polka dot decorative paper for the front of my card and then added  the lollipop journal block   to which I  stamped my sentiment from the Tags & Things.   I couldn't resist using the yellow crepe paper and cut a thin strip with scissors and then ran through my sewing machine to create this ruffle.  I  hand cut the little boy and house  from the decorative paper then attached with foam dots.  The photo corners were created with red foil super fast by cutting a square, then using a smaller square punch in the center and snip on an angle.  Now you have your own customized photo corners.
I attached the corners with my stapler.  A couple of buttons and a touch of glitter for the lollipops and it was done.
My last card is a vogue tribute.  This card uses lots of the Dimestore Vogue .
I started with a kraft cardstock base and then cut a strip of the pattern print from the Paper Sheets and Tags set .  I punched a scallop edge a long the bottom.  I added a piece of velvet trim with a die cut buckle which is stapled to the edges.  In the center of the buckle is a die cut yellow button fastened with floss.   I cut a panel of the blue gingham and then started layering! I cut out the word "fabulous" from the pattern paper , added glitter alpha stickers to spell "you", and  layered a green tag to the left of it. I created a handmade stick pin easily to coordinate with the card.
To create the stick pin I used a large pearl topped corsage pin and wrapped a pennant shape I hand cut from the pattern paper.  I attached a button with pink Twirly Twine to complete.  Warning!!!  These are addictive to make!  :-)
I hope you enjoyed today's cards and are inspired to make something!

Bon Appetit

 A blessed Sunday to you! What a week we have had in my household with rehearsals, concerts, work, and more.  Better to be busy though as it keeps me moving.  :-)
Today's card blends some older products with a retro image to create vintage nouveau.  Old is new and cool I guess?  It came together quickly which makes me happy!
The new challenge at Sentimental Sundays is metal.  Our sponsor is Kenny K Downloads. The image is Chef which I colored in with Copics.  I started with a layer of Mead lined paper which shows faintly on the left.  The black print was layered with a die cut label and a strip of the other side was punched with a scallop border punch.  

I used a SRM Sticker in yellow to bring a little color out.  The papers are all Sassafras Lass.  I am happy to finally use these as they have been sitting in my stash for too long.  I added four silver eyelets to the scallop border for my metal in the challenge.
Hope you will join us!

Supplies used:
card base: Paper Studio
pattern papers/die cut : Sassafras Lass
sticker: SRM Stickers
eyelets: Dritz
other: foam dots


3.15.2012

Positive and negative butterfly frame

Hey there! Here's a project I worked on today that I really enjoyed!  It features lots of SRM Stickers!
I took the We Got Your Border stickers from sheet # 57001 Baby Boy and placed them on a tag. I then die cut a butterfly from the tag to make a frame and placed a picture behind it. A few butterfly punches and a little trim to embellish and my tag is complete.
Then I took the positive side and created a mini picture frame.
I tied a peice of yellow floss with a button and attached the butterfly to a white washed painted frame with a foam dot.

This makes a cute little gift set give to new parents or grandparents and it's super easy to create! When I was making this, I was very careful to notice my sticker usage. Why you ask? Because I like to stretch my products as much as possible! This project takes a quarter of the sheet so you still have plently left to create cards, layouts, etc.

Springing Forward

It's time to share a new card for Penny's.  The challenge is 3 buttons, 2 designer papers,  and 1 ribbon.  I used some more papers a friend sent me recently to create this card.   I started with a craft card base and rounded the corners.  Next I added a panel of light pink paper with one rounded corner on the bottom left.  I cut a pennant shape and wrapped twine around to make a bow and then added two buttons. 
The digital image is from Robyn's Fetish.  I cut it out and popped up with foam dots.  I stamped my sentiment and then accented with a rhinestone. 
Sorry this is a quick post because short on time. 


3.12.2012

Follow Your Heart

Hey there! Happy Monday to you! I have a little keepsake box to share with you today that can be used for an anniversary, just because, or what ever occassion you see fit.  :-)
 I covered the matchbox with pattern paper and distressed with sandpaper.  Then I punched a label bracket from a stripe pattern paper and added my SRM Sticker sentiment plus two heart die cuts sewn together.  I added a strip of rhinestone to make it sparkle!  The ribbon is tied around the top of the box and a button with floss attached to the center.
 For the inside box, I painted it cream and then distressed to match the casing.  I added SRM border stickers on both the left and right side of the box as shown.   Inside I placed the perfectly sized "XO" sticker. How I love that SRM Sickers adhere nicely to any surface.

                                       
I created my handle with a stick pin and earring back.

I hope you like!

3.11.2012

Floral Greetings

Happy Sunday to you!  I hope you are having a blessed day!  it sure is gorgeous here in VA and we already have many bulbs popping up along with a few trees blossoming.   I spotted pansies last week while out shopping and I love the variety of colors from vibrant purples, to indigo's, to the subtle whites with hints of other hues in their centers.  I wanted to buy some but was fearful they would not last if the winter weather returned but looks like we have lovely weather for the next week!  Yeah!  What a treat indeed!
Which brings me to today's card.  I used a Bugaboo digi image that I was so happy to find.  I usually opt for the super cute ones but this new line they have caught my eye and I wanted a go at it.  :-)

I used some paper a friend sent me and then had this recycled tag I layered the image on.  The center of t pansies has yellow glitter but does not show as well as I had wished.    That's the challenge this week at Sentimental Sundays, go green or recycle.  Up to you to interpret.  
The tag was from an article of clothing.  It said "Safari is a way of life."  I tied a big piece of purple seam binding from Martha Stewart to help hide a little of it.  I also added a panel of bright yellow card stock at the bottom of the tag to cover a picture.  Looking at this from the first picture it kinda reads, "Hello Life"  and I like that.  :-)
I hope you will join us for the challenge!

Challenges I would like to enter this card in:
2 Sisters: #82 Spring colors
Allsorts: #145 Say it Flowers
Crazy 4 Challenges: #127 Spring is in the Air
Gingerloft: #35 Spring 
Our Creative Corner: Papercraft Tic Tac Toe Flowers, Yellow and Glitter (flower centers)


Supplies used:
card base: Paper Studio
pattern papers: craft supply
digi stamp: Bugaboo
stamp: CTMH Say It In Style
ink: Inkadinakdo black
ribbon: Martha Stewart
twine: The Twinery 
button: Sassafras Lass
tag: recycled 
glitter: Stickles yellow


3.08.2012

Hope for you

 It's looking like a gorgeous day here.  Hope you are having a beautiful day wherever you may be.  After a week of tumultuous weather in other parts of the US, I am thankful to have a home still.    I keep reading about the horrific tornadoes  that struck parts of the mid west/south  and my heart breaks for those affected.  It's awful!  So many have lost their loved ones, homes, everything except the clothes on their backs.  Rescue efforts are ongoing.  Prayers for those suffering/enduring this tragic event. 
Thoughts like these inspired me to make an encouraging card.  I love Psalm 71:5 "for you have been my hope."  I have trusted in Him since my youth and believe he will protect me through it all.  


Challenges I would like to enter this card in:
Crafts and Me: #74 Things with Wings
Craft-room Challenge: Shabby/Vintage
Craft Your Passion: 100th Post Celebration Anything Anything Goes
My Craft Spot: #47 For the Birds
My Mum's Craft Shop: #47 Spring Has Sprung
Paper Creations Ink: Spring is in the Air
The Shabby Tea Room: #104 Colorful Creations

Thank you for stopping by!

3.03.2012

A little bit modern

You know sometimes I get really perplexed about how to use something and this was one of those weeks for me.  A few digis were challenging me because I am so far from being a Copic master.  Grrrr!  I guess the main thing is I tried and here are the end results.  By the way, I have a much different style to share with you that features the other digi I was unsure of how.  The latest challenge at Penny's is based on a photo inspiration you can see here.
Here's a straight on shot to show the bottom of the card a little better.
This sassy girl is from Kenny K.  I decided to make this a bold card with the white words on black pattern paper which is an oldie paper that I have been hanging on to use.  I added a splash of color with the polka dot print from an older Crate paper scrap.  Her dress was given a touch of  glossy accents and three buttons were added to accent.  I added a SRM Sticker to complete.


Thanks for stopping by!

Challenges I would like to enter my card in:
Crafts 4 Eternity: #61 Digital
Going Grey: Pop It 
Our Craft Lounge: #107 Black, white, and pop of color
Paper Crafting Journey: #4 Anything Goes
Pixie Dust Studios: #116 Buttons
Raise the Bar: #94 Twine
Shopping Our Stash: #41 Sentiments required